
Questo schema amigurumi è un progetto veloce e divertente da aggiungere alle tue decorazioni fai da te di Halloween. Divertiti a realizzare un piccolo corvo con cui decorare la tavola per il tuo prossimo Halloween party.
Lo schema è facile da seguire anche se sei un principiante, vedrai che ti divertirai con questo progetto!
Iniziamo!
Click here for the ENGLISH VERSION
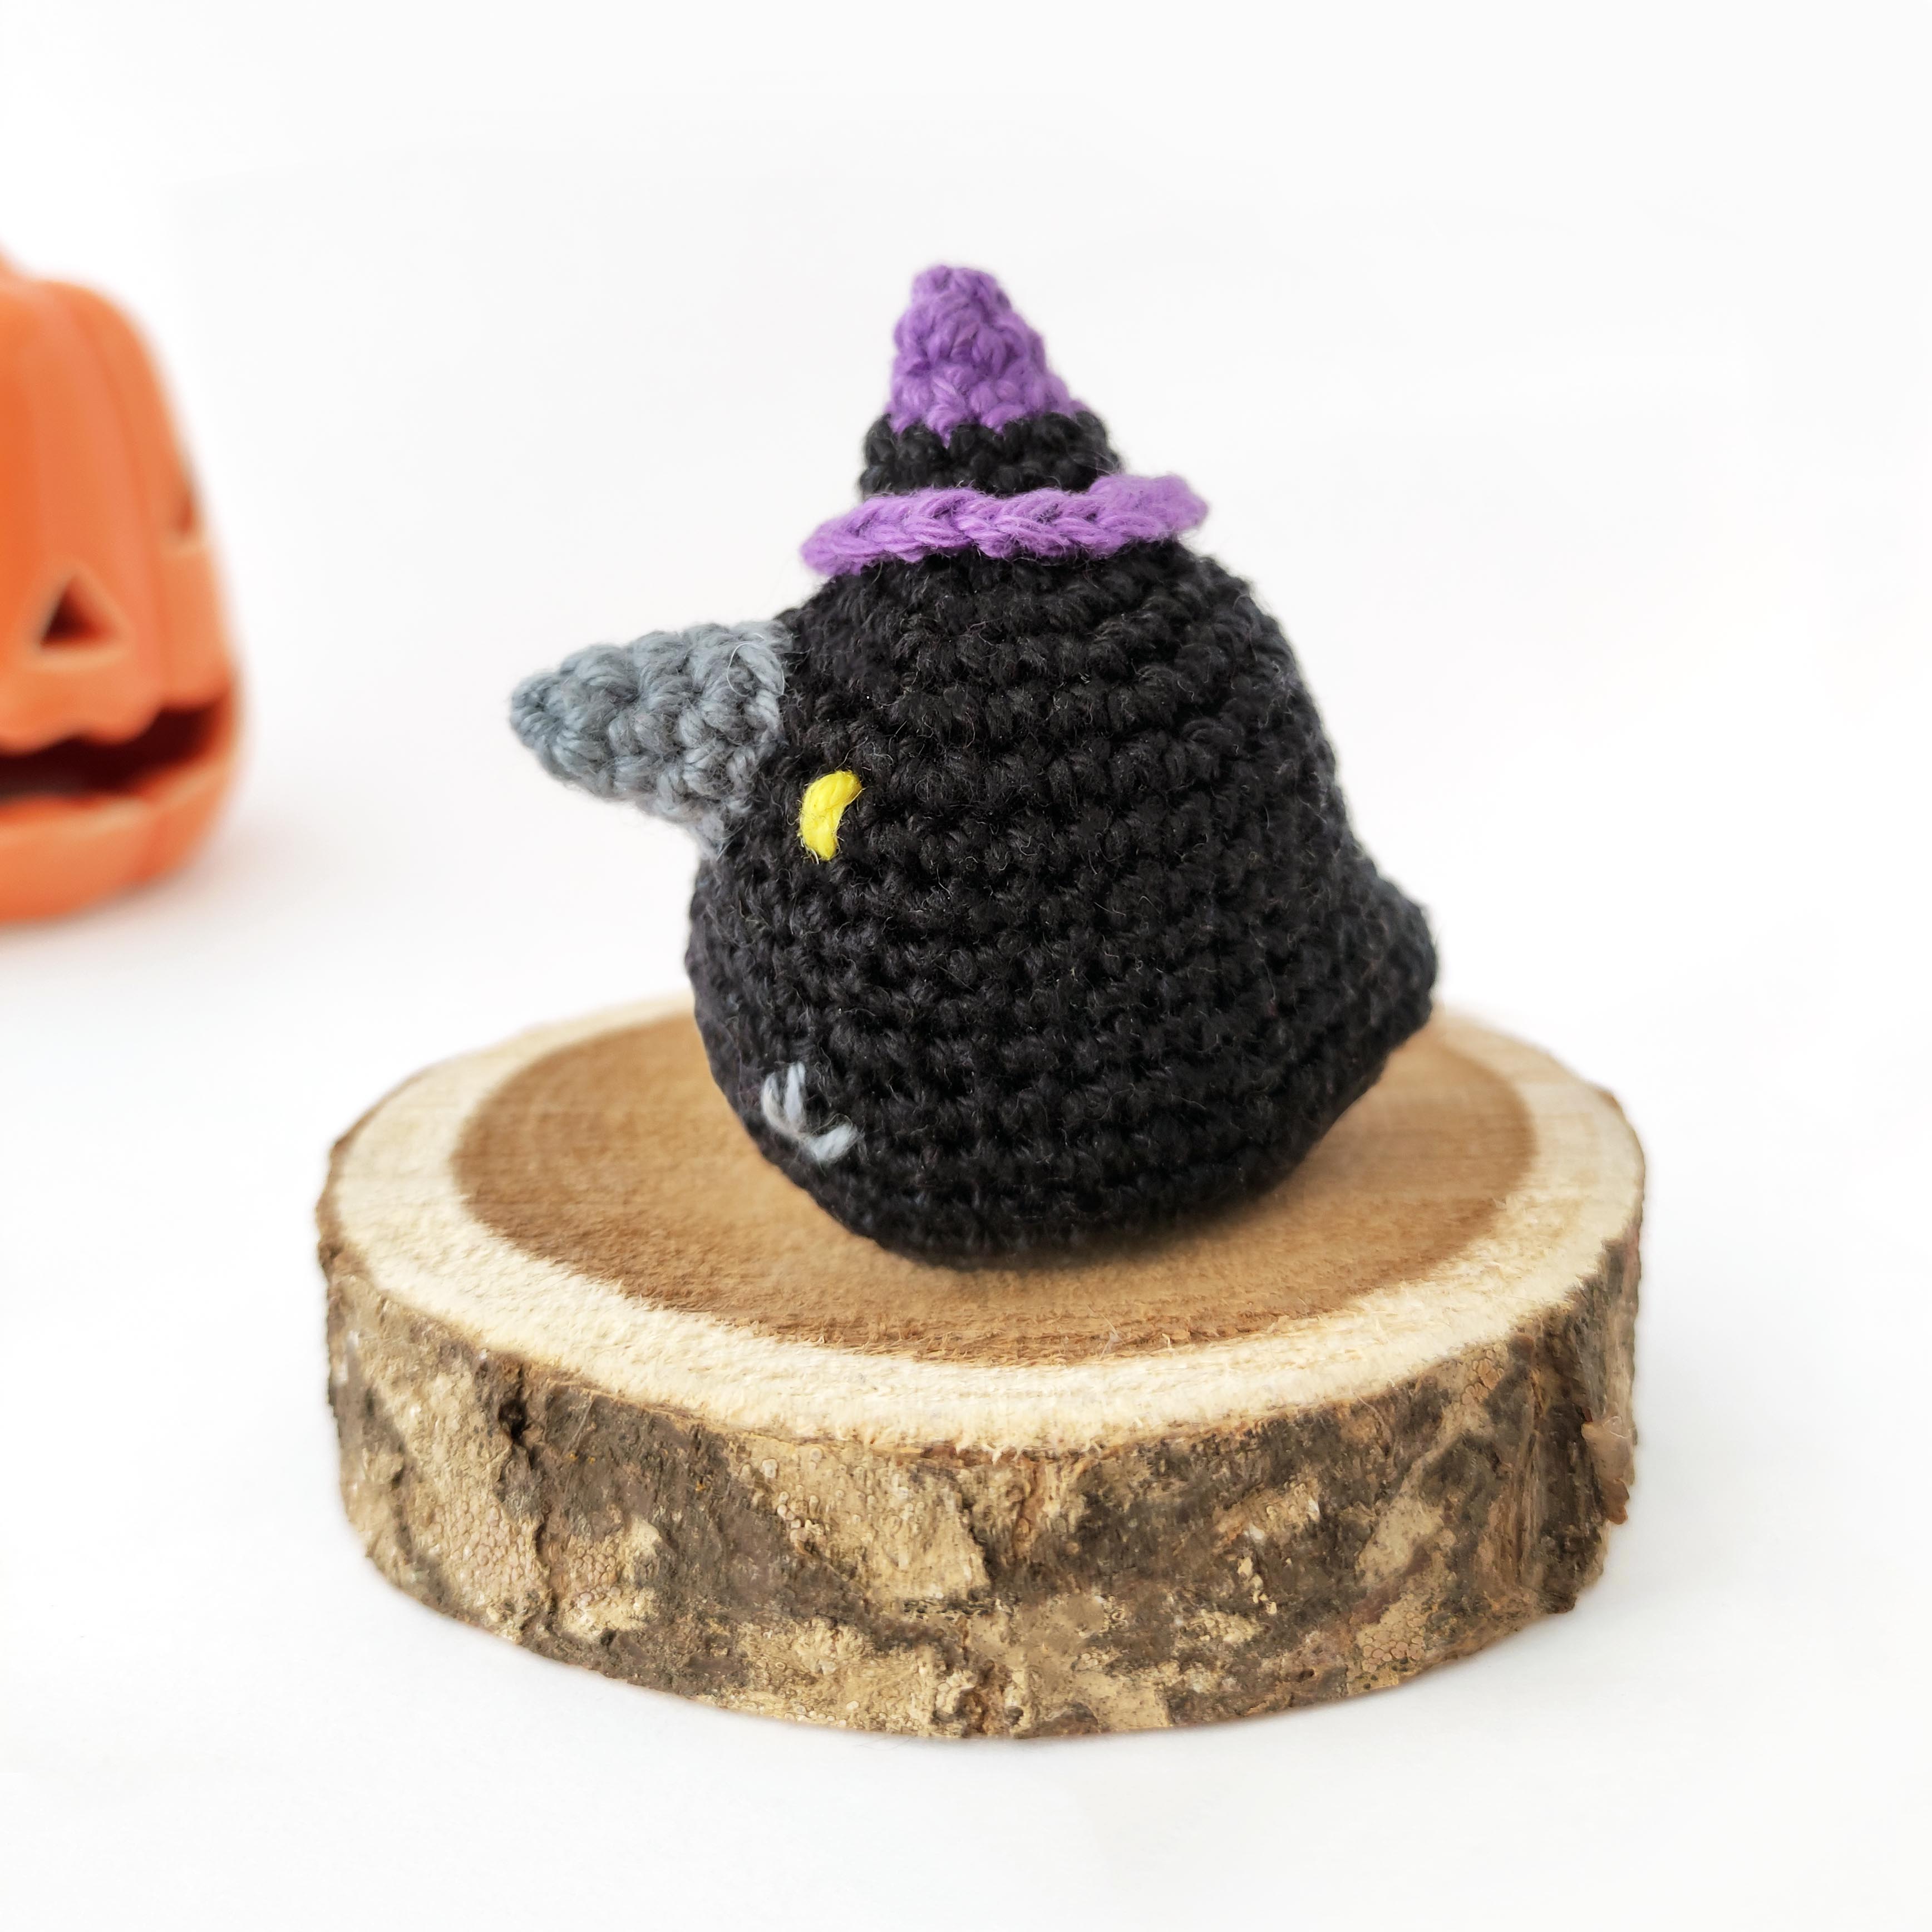
Dimensioni: con questo schema otterrai un piccolo corvo alto circa 6 cm (utilizzando il filato e l’uncinetto indicati)
Difficoltà: Principiante, questo schema è adatto a chi si avvicina per la prima volta agli amigurumi ma ha una conoscenza di base dell’uncinetto
Punti utilizzati e abbreviazioni:
- cerchio magico: CM
- cat: catenella
- mb: maglia bassa
- aum: aumento
- dim: diminuzione invisibile
- (…)x … volte: ripetere la sequenza tra parentesi
il numero di volte indicato - tot: indica il totale delle maglie di ogni giro
Materiali:
- uncinetto n. 2,75 mm
- filato di cotone nei colori nero, grigio scuro e viola (pochi grammi) e una piccola quantità di filo di colore giallo per ricamare gli occhi
- imbottitura in poliestere
- ago, forbici e segnapunti
Info aggiuntive
Lo schema è realizzato con la lavorazione in tondo a spirale.
il corpo è realizzato in un unico pezzo, iniziando dalla testa e arrivando alla base. Il becco e il cappello sono lavorati a parte e poi cuciti al corpo.
Per realizzare questo schema ho usato il cotone Catania Schachenmayr (https://schachenmayr.com/en/yarns/catania)
CORPO
1. Con il filo di colore nero: 6 mb nel CM.
2. 1 aum in ogni maglia: tot 12
3. (1 mb, 1 aum) x 6 volte: tot 18
4. (2 mb, 1 aum) x 6 volte: tot 24
5. (3 mb, 1 aum) x 6 volte: tot 30
6-9. 30 mb (4 giri)
10. (4 mb, 1 aum) x 6 volte: tot 36
11. (5 mb, 1 aum) x 6 volte: tot 42
12. 3 cat, a partire dalla seconda cat dall’uncino: 1 mb in ognuna delle 2 cat successive, continuare con 1 mb in ogni maglia (42), 1 mb nell’asola non lavorata di ciascuna delle 2 cat iniziali: tot. 46
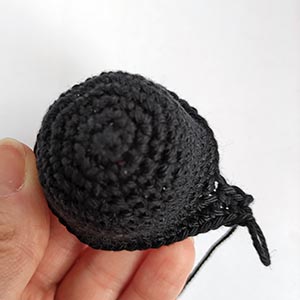
13. 46 mb
14. (1 dim) x 2 volte, 38 mb, (1 dim) x 2 volte: tot. 42

15. (5 mb, 1 dim) x 6 volte: tot. 36
16. (4 mb, 1 dim) x 6 volte: tot. 30
17. (3 mb, 1 dim) x 6 volte: tot. 24
18. 1 dim per tutto il giro: tot. 12
Imbottire
19. 1 dim per tutto il giro: tot. 6
Chiudere lasciando del filo per cucire. Infilare l’ago e entrare in ognuna delle asole davanti delle 6 maglie e tirare il filo, poi nasconderlo all’interno.

BECCO
1. Con il filo di colore grigio scuro: 4 mb nel CM.
2. (1 mb, 1 aum) x 2 volte: tot 6
3. (2 mb, 1 aum) x 2 volte: tot 8
4. (3 mb, 1 aum) x 2 volte: tot 10
Chiudere lasciando del filo per cucire e imbottire.

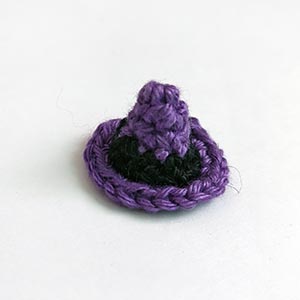
CAPPELLO
1. Con il filo di colore viola: 4 mb nel CM.
2. (1 mb, 1 aum) x 2 volte: tot 6
3. (1 mb, 1 aum) x 3 volte: tot 9
4. Cambia con colore nero: (2 mb, 1 aum) x 3 volte: tot 12
5. 12 mb
6. Cambia con colore viola, solo nell’asola davanti: 1 aum in ogni maglia: tot 24
Chiudere lasciando del filo per cucire e imbottire leggermente.
ASSEMBLAGGIO E ULTIMI PASSI
Ricamare gli occhi usando una piccola porzione di filo di colore giallo:

Trova il centro rispetto alla coda

Ricama 3 linee verticali tra i giri 6 e 7, gli occhi sono alti 1 maglia.
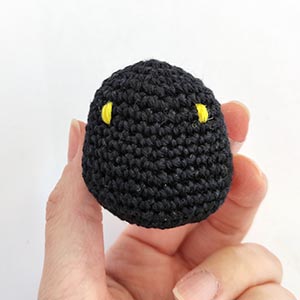
Lascia uno spazio di circa 7 maglie tra di loro
Cucire il becco al centro tra gli occhi, tra giri 5 e 8
Ricamare le zampe usando una piccola porzione di filo di colore grigio scuro:

Ricamare le zampe sul fronte tra i giri 11 e 12 iniziando con una linea dritta allineata con gli occhi

Ricamare 1 linea obliqua su ciascuno dei lati della linea dritta
Cucire il cappellino sulla testa, posizionandolo leggermente obliquo
Abbiamo terminato!


ENGLISH VERSION
jasper the raven amigurumi pattern
This crochet pattern will be a quick and fun project to add to your Halloween diy decors.
It will allow you to make your own little chubby crow that can be used as a decorative table accessory for your next Halloween party.
It’s easy to follow, so if you are a beginner crocheter you can still have fun with this project!
Let’s go!
Dimensions: with this pattern you will get a little crow about 6 cm/2 inches high (using the yarn and crochet indicated)
Difficulty: Beginner
Terms (US terminology)
– MR: magic ring
– ch: chain
– sc: single crochet
– inc: increase
– dec: invisible decrease
– st(s): stitch(es)
– (…)rep…times: repeat stitches within brackets x times
– R: round(s)
– BLO: crochet only in the back loop
Materials:
- hook n. 2,75 mm
- black, dark gray and purple cotton yarn (a few grams)
- a small amount of black yellow yarn for the eyes
- pins, yarn needle, scissors and stitch marker
- fiberfill for stuffing
Additional info
I worked in continous rounds.
The body is made in one piece, starting from the top and arriving at the bottom. The beak and hat are worked separately and then sewn onto the body.
To make Jasper I used Catania Schachenmayr cotton yarn, but of course you can use the colors and yarn you prefer.
(https://schachenmayr.com/en/yarns/catania)
BODY
R1. Using black yarn: 6 sc in MR.
R2. 1 inc in each st (12)
R3. (1 sc, 1 inc) rep 6 times (18)
R4. (2 sc, 1 inc) rep 6 times (24)
R5. (3 sc, 1 inc) rep 6 times (30)
R6-9. 30 sc (4 rounds)
R10. (4 sc, 1 inc) rep 6 times (36)
R11. (5 sc, 1 inc) rep 6 times (42)
R12. 3 ch, starting from the second chain from hook: 1 sc in each of 2 next ch, 1 sc in each sts of the previous round (42), 1 sc in the unworked loop of each of the 2 ch (46)
R13. 46 sc
R14. (1 dec) rep 2 times, 38 sc, (1 dec) rep 2 times (42)
R15. (5 sc, 1 dec) rep 6 times (36)
R16. (4 sc, 1 dec) rep 6 times (30)
R17. (3 sc, 1 dec) rep 6 times (24)
R18. 1 dec all around (12)
Stuff the body
R19. 1 dec all around (6)
Fasten off leaving a end.
Thread the needle and use it to go through each front loop of the 6 sts and pull the thread to close the hole.
BEAK
R1. Using dark gray yarn: 4 sc in MR
R2. (1 sc, 1 inc) rep 2 times (6)
R3. (2 sc, 1 inc) rep 2 times (8)
R4. (3 sc, 1 inc) rep 2 times (10)
Fasten off leaving a end for sewing and stuff.
HAT
R1. Using purple yarn: 4 sc in MR
R2. (1 sc, 1 inc) rep 2 times (6)
R3. (1 sc, 1 inc) rep 3 times (9)
R4. Change with black yarn: (2 sc, 1 inc) rep 3 times (12)
R5. 12 sc
R6. Change with purple yarn, in BLO: 1 inc in each st (24)
Fasten off leaving a end for sewing and stuff lightly.
ASSEMBLY AND LAST STEPS
Embroider the eyes using a small amount of yellow thread:
Find the center using the tail as a reference
Embroider 3 vertical lines between rounds 6 and 7, the eyes are 1 stitch high
Leave a space of about 7 stitches between them
Sew the beak in the center, between rounds 5 and 8
Embroider the paws using a small amount of dark gray thread:
Embroider the paws on the front between rounds 11 and 12 starting with a straight line aligned with the eyes
Embroider 1 oblique line on each side of the straight line
Sew the hat on the head, positioning it slightly slanting
We finished!

Una risposta a "Jasper il corvo | Jasper the raven"